4.2 KiB
ESP MQTT JSON Multisensor
This project shows a super easy way to get started with your own DIY Multisensor to use with Home Assistant, a sick, open-source Home Automation platform that can do just about anything.
Bonus, this project requires no soldering and no breadboards - just header wires and the development board!
Video Tutorial - https://youtu.be/jpjfVc-9IrQ
The code covered in this repository utilizies Home Assistant's MQTT JSON Light Component, MQTT Sensor Component, and a NodeMCU ESP8266 development board.
Supported Features Include
- DHT22 temperature sensor
- DHT 22 humdidity sensor
- AM312 PIR motion sensor
- photoresistor or TEMT600 light sensor
- RGB led with support for color, flash, fade, and transition
- Over-the-Air (OTA) upload from the ArduinoIDE
OTA Uploading
This code also supports remote uploading to the ESP8266 using Arduino's OTA library. To utilize this, you'll need to first upload the sketch using the traditional USB method. However, if you need to update your code after that, your WIFI-connected ESP chip should show up as an option under Tools -> Port -> Porch at your.ip.address.xxx. More information on OTA uploading can be found here. Note: You cannot access the serial monitor over WIFI at this point.
Parts List
Amazon Prime (fast shipping)
- NodeMCU 1.0
- DHT22 Module
- LDR Photoresistor Module OR
- TEMT6000
- Power Supply
- Common Cathode RGB Led
- Header Wires
- AM312 Mini PIR Sensor
Aliexpress (long shipping = cheap prices)
- NodeMCU 1.0
- DHT22 Module
- LDR Photoresistor Module OR
- TEMT6000
- Power Supply
- Common Cathode RGB Led
- Header Wires
- AM312 Mini PIR Sensor
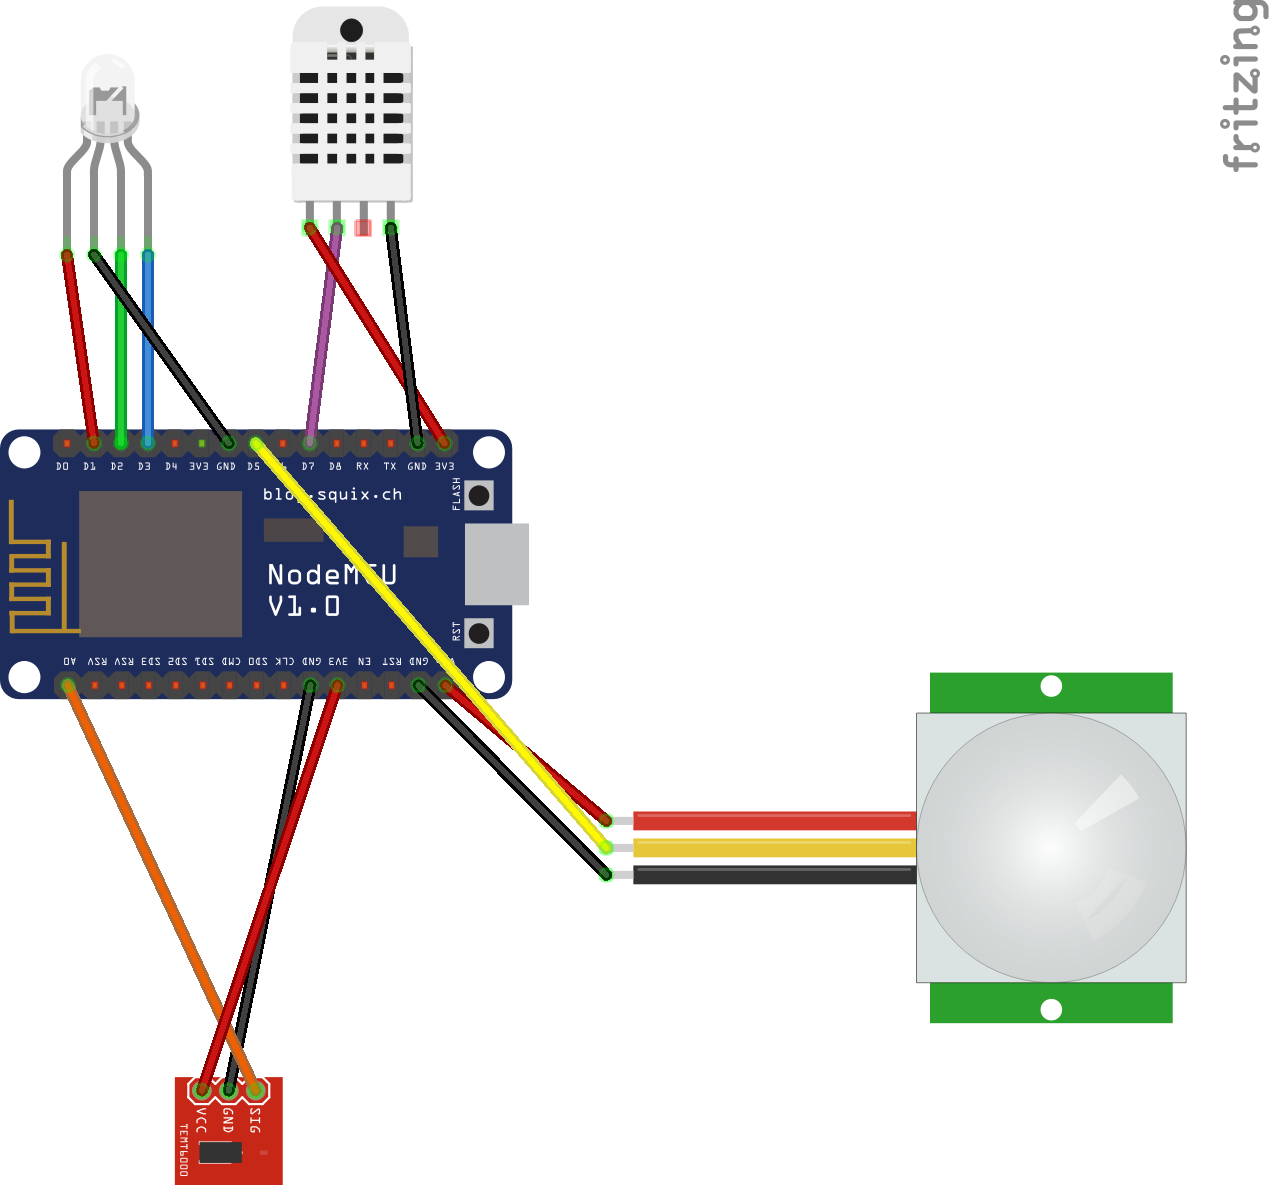
Wiring Diagram
3D Printed Enclosure
In an effort to make the sensor less ugly, I designed an enclosure in 123D Design and uploaded the STL file in case you want to print your own. It's also availible on Thingiverse. I printed mine on a Prusa I3 clone with a layer height of 0.2 mm, 40% infill, and no supports in ESUN PLA and it turned out great.
Alternatively, you can also make your own enclosure by hand using something like Instamorph. It's themoplastic that melts in hot water and then solidifies to hard plastic at room temperature. You can even get pigment packs and take it next level. I, personally, suck at using it, but it's cheap and functional.
Of course, you can use a project box, tupperware, a card board box, or skip the enclosure all together.
Home Assistant Service Examples
Besides using the card in Home Assistant's user interface, you can also use the Services tool to control the light using the light.turn_on and light.turn_off services. This will let you play with the parameters you can call later in automations or scripts.
Fade the Light On Over 5 Seconds - light.turn_on
{"entity_id":"light.sn1_led",
"brightness":150,
"color_name":"blue",
"transition":"5"
}
Flash The Light - light.turn_on
{"entity_id":"light.sn1_led",
"color_name":"green",
"brightness":255,
"flash":"short"
}
Fade the Light Off Over 5 Seconds - light.turn_off
{"entity_id":"light.sn1_led",
"transition":"50"
}
